%20(51).png)
You may have already noticed that ChatGPT is a very basic chatbot that cannot converse with you on a personal level or cater to your specific needs.
However, imagine a highly intelligent ChatGPT chatbot that understands every aspect of your business and tirelessly handles customer inquiries 24/7.
This is now achievable by training an AI chatbot on personalized data to create a custom AI chatbot for your company.
With this exciting opportunity, we will explore and share the intriguing techniques, tools, and advice needed to build your own ChatGPT chatbot that can potentially change the way you communicate with your website visitors.
What is ChatGPT?
ChatGPT is an AI chatbot developed by OpenAI. It creates responses from the user's input by utilizing natural language processing and machine learning. Users can chat with the AI bot to create outlines, articles, stories, and summaries based on their conversations with ChatGPT.
This AI chatbot has a great benefit- it can recall prior conversations, providing a smooth engagement the next time around. Its initial use is based on GPT- tech, but to tap into ChatGPT Agent and more, one needs a Plus package deal.

Features
ChatGPT remembers previous chats and allows users to ask follow-up questions, providing a quality conversation experience. Additionally, ChatGPT was trained using a large amount of internet data.
In addition to generating responses to prompts, ChatGPT also can create entry and intermediate code in any programming language. To accomplish this, simply inform ChatGPT of the programming language you require and describe the code you need. ChatGPT will analyse your input and generate code in the programming language specified. Moreover, you can refine or shorten the code generated by ChatGPT to meet your specific needs.
Another feature of ChatGPT is that it can find errors in your code blocks and explain them to you. If there is an error in your code and you cannot find it, you can use ChatGPT! Now let's move onto how you can train this smart chatbot on your own data.
How to train ChatGPT on your own data?
In order to accomplish this goal, there are essentially two methods available to you: one of them requires expertise in programming, while the other can be completed without any coding experience in just four minutes.
If you want to skip to the no-code solution, click here.
Full-code solution with the API
Before we begin, we should warn that this section requires coding experience and extensive understanding of Pyhton. If you are looking for a no-code solution, click here. Before you can train a customized ChatGPT AI chatbot, you will need to set up a software environment on your computer. Here are the steps to do so.
Step 1: Install Python & Upgrade
First and foremost, download and install Python from the official website. Make sure to check the "Add Python.exe to PATH" option during setup. Secondly, upgrade Pip, which is a package manager that allows you to install Python libraries.
This can be done through the Terminal on Windows or Command Prompt on macOS. Finally, install the essential libraries needed to train your chatbot, such as the OpenAI library, GPT Index, PyPDF2 for parsing PDF files, and PyCryptodome. These libraries are crucial for creating a Large Language Model (LLM) that can connect to your knowledge base and train your custom AI chatbot.
Step 2: Install a code editor (such as VS Code)
Firstly, download a code editor such as Notepad++ for Windows or Sublime Text for macOS and Linux if you have experience with more powerful IDEs like VS Code.
Step 3: Generate your API Key & Secret Key
Next, you will need an API key from OpenAI to train and create a chatbot that uses a custom knowledge base. To obtain this key, create an account on OpenAI or log in to your existing account, then select "View API keys" from your profile and click "Create new secret key" to generate a unique API key. It is important to save this key to a plain text file and keep it private as it is only accessible to your account. Additionally, you can create up to five API keys if necessary.

Once you have set up your software environment and obtained an OpenAI API key, it is time to train your own AI chatbot using your data.
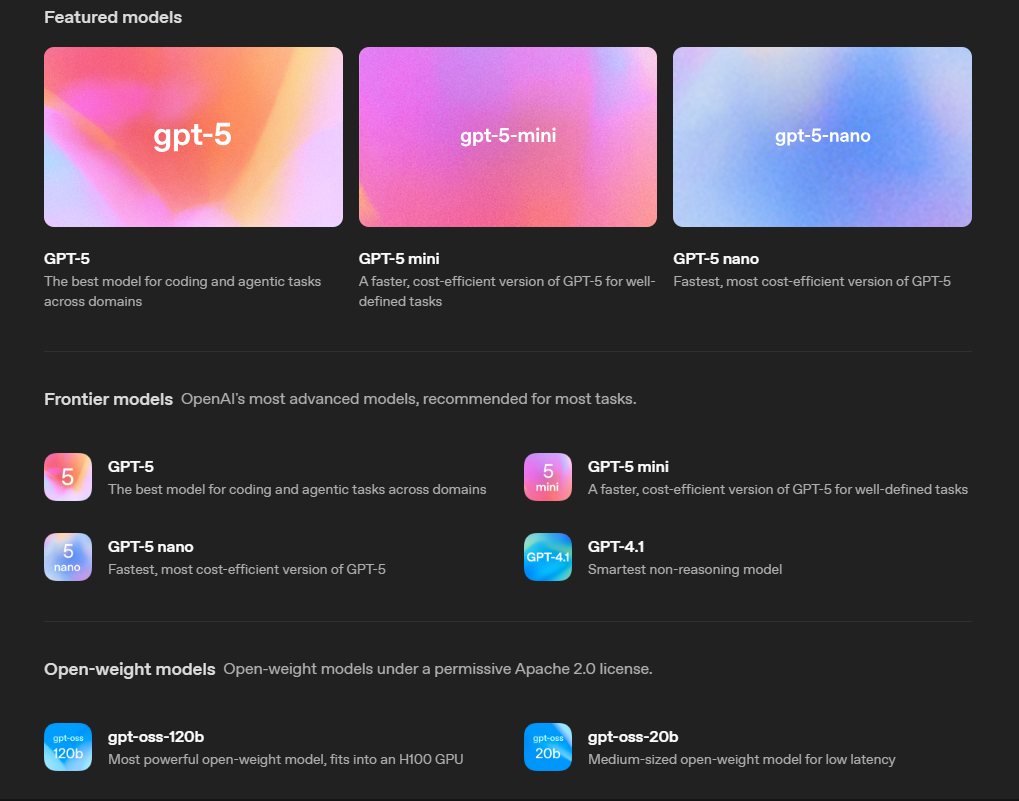
Step 4: Select your model & create your knowledge base
You can choose to use either the "gpt-5" model or "gpt-4.1." To begin, create a folder named "docs" and add your training documents, which could be in the form of text, PDF, CSV, or SQL files, to it.
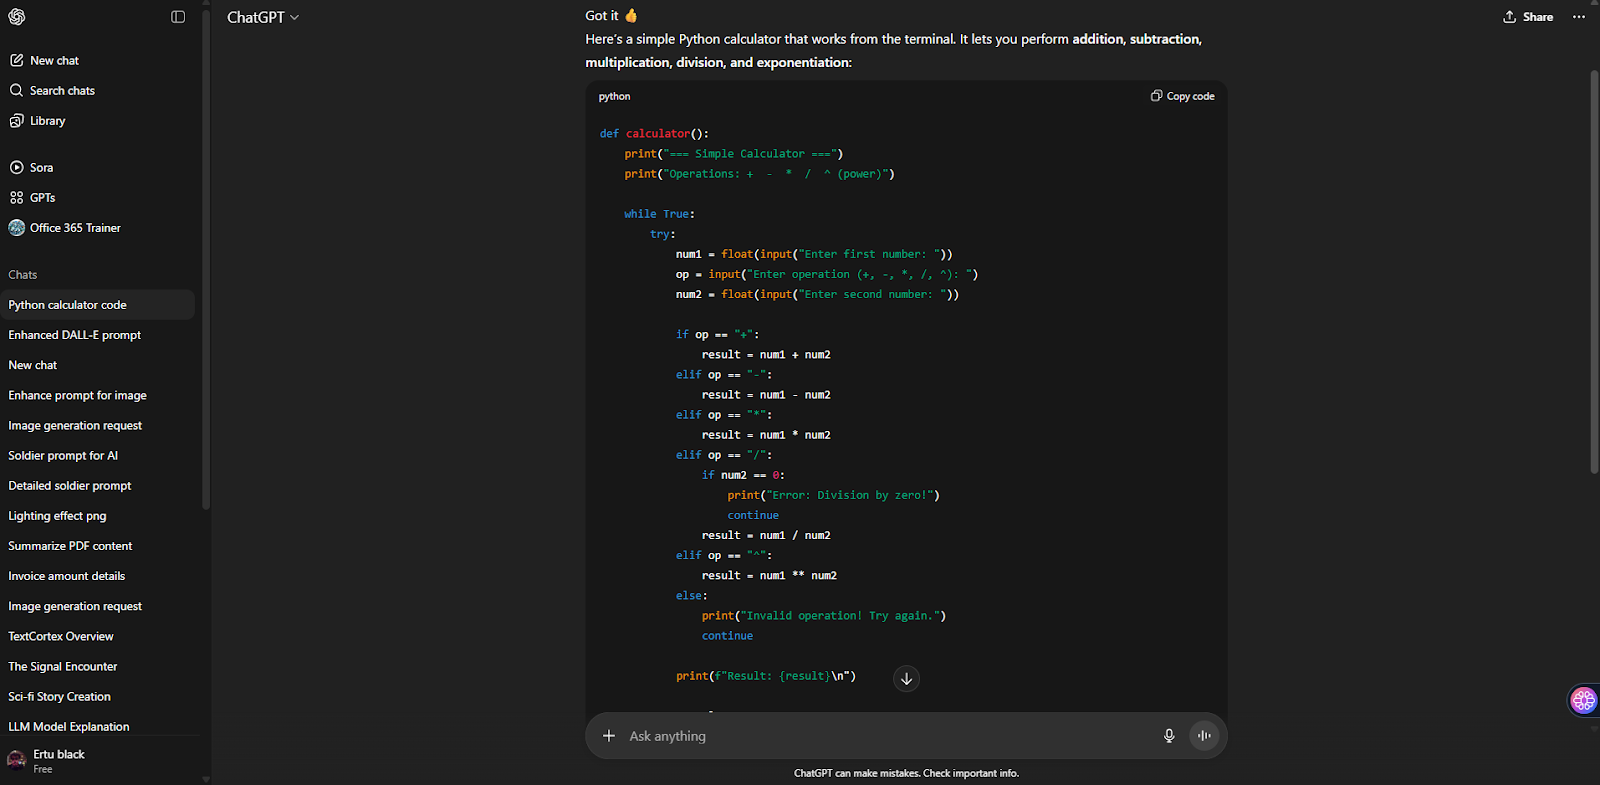
Step 5: Create the script
Next, open your code editor and save the following code as "app.py" in the same folder as the "docs" folder. Make sure to replace the text "Your API Key" in the code with the API key you obtained from OpenAI and save the changes.
After running the code in Terminal to process your documents and create a JSON file, a local URL will be generated. Simply copy and paste this URL into your web browser to access your custom-trained ChatGPT AI chatbot.
Now, you can ask your chatbot questions and receive answers based on the data you provided.
No-Code Solution with TextCortex - Knowledge Bases
It's simple to train your artificial intelligence (AI) using your own data with TextCortex. Furthermore, you can even further customize it with custom personas by adding personalized inputs, such as voice and style. Custom personas help create virtual twins or brand representatives tailored to your imagination.
If you are a visual learner, watch this short video on how you can create your knowledge base and train Zeno on your own data.
And before we begin how you can achieve that in very simple steps, see it in action to understand how much value it can provide for your needs.
How to train AI on custom data? - Quick guide step by step
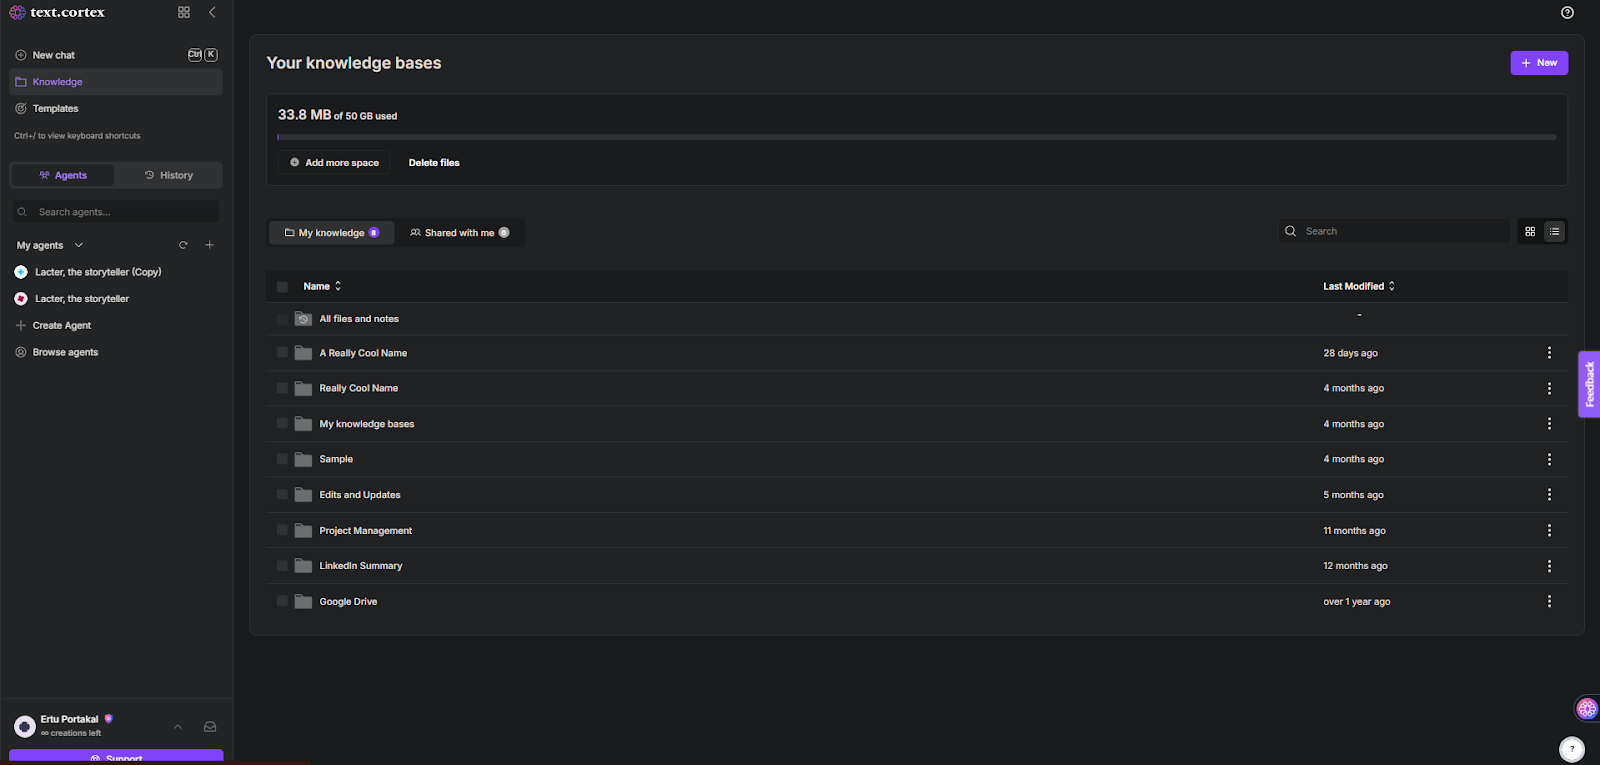
1. Navigate to the TextCortex web application. From there, click on the "Knowledge" tab and hit "+New" button.
Also keep in mind that if you have any uploaded files that you haven't added into any knowledge base yet, you will find them in the "Upload History" tab.
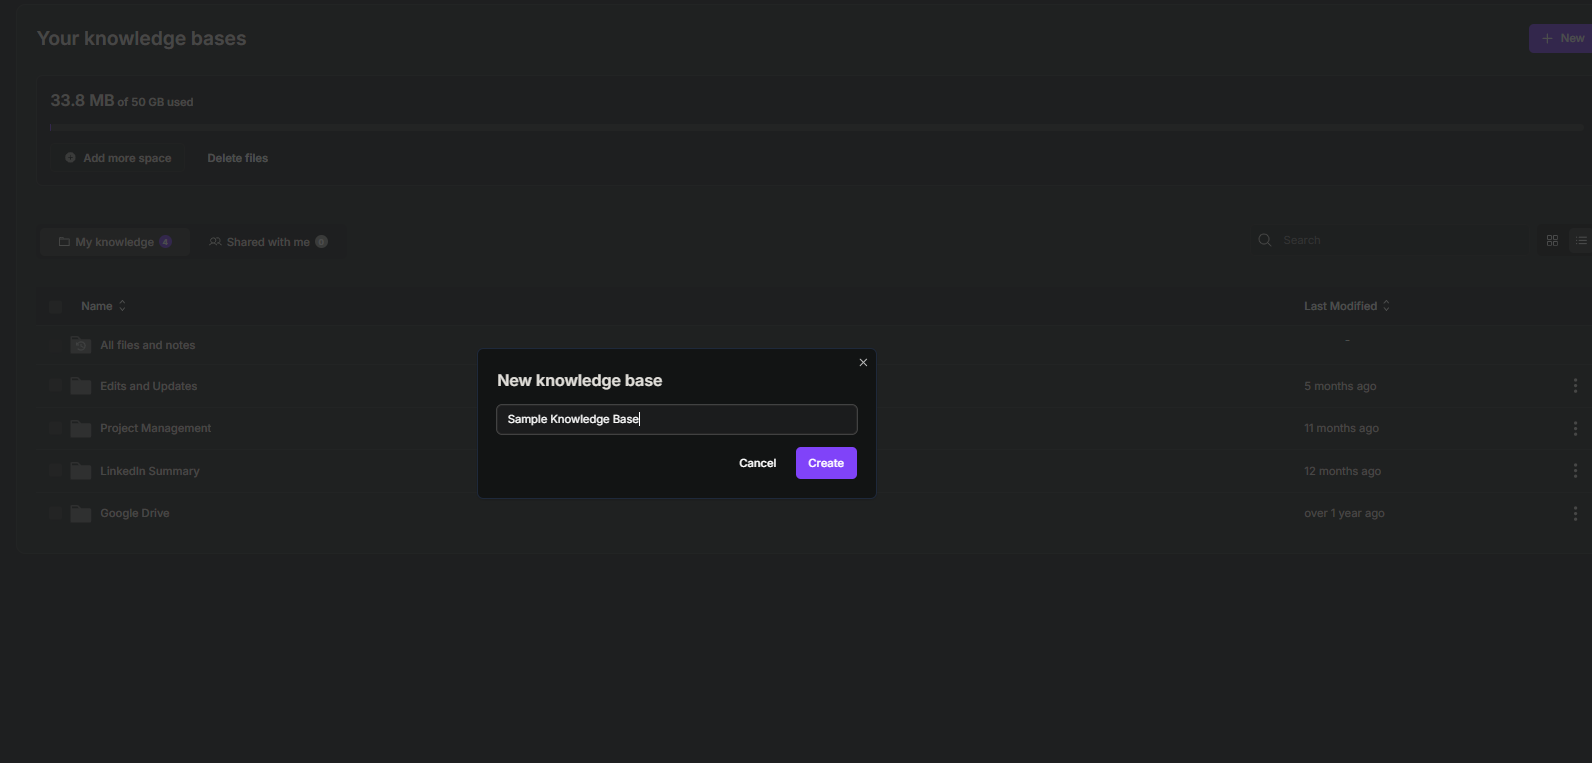
2. Give your knowledge base a cool name and click the “Create” button.
3. Once you've created your knowledge base, you will see a drive-like view where you can upload connectors (documents, custom URLs etc.)

4. You can choose to upload documents or add custom URLs to your knowledge base. We currently support PDF, CSV, PPTX and DOCX file formats. Keep in mind that all files are processed by TextCortex without the use of third parties.
Refer to our article "How We Handle Data at TextCortex" for more information.
Pro tip: You can also insert several files to allow mass-upload.
5. Once your files have been uploaded, head over to ZenoChat and locate the "@Add context" button. Then, you'll be able to select between multiple knowledge bases as the base information for AI responses.

That's it! You're now ready to harness the full power of our new Knowledge Bases feature. Go ahead and create multiple knowledge bases for a variety of purposes.
Here's a small example of what you can do with it! ⬇️

Pro Advice
Make sure to be very specific when asking questions to your AI. Remember, your AI is as capable as your guidance; the more specific instructions you give, the better results you will get in return.
Frequently Asked Questions
Can I train ChatGPT on my own data?
Yes, you can train ChatGPT using your own data by using its API and custom GPT features. However, you can leverage TextCortex's knowledge base to upload and train the conversational AI assistant ZenoChat. Through ZenoChat, you can upload custom data and connect data sources such as Google Drive, Notion, and Microsoft OneDrive.
How to train ChatGPT with files?
To train ChatGPT with custom data, follow the next steps:
- Step 1: Install Python & Upgrade
- Step 2: Install a code editor (such as VS Code)
- Step 3: Generate your API Key & Secret Key
- Step 4: Select your model & create your knowledge base
- Step 5: Create the script
Can you train a chatbot on your own data?
A chatbot trained on your data can help you with daily or professional tasks. For example, you can train the ZenoChat by TextCortex AI chatbot with your own data and leverage it to complete repetitive tasks quickly and easily. Moreover, you can build ZenoChat with your own tone of voice and use it for tasks such as responding to emails and writing articles.
.png)
.png)
.png)